官方文档的推荐配置是使用Ubuntu/RHEL + MySQL/MariaDB + Apache + PHP,也是优先的选择,我第一次搭建的时候就是用的这一套选择,最近在一台新机上搭建时发现官网提供了Nginx配置,就用LNMP搭建了一次,索性就把这次和之前LAMP的搭建步骤都记录下来
参考文档:
LAMP
使用配置:Debian11 + Apache2 + MariaDB + PHP8.2/PHP8.2-FPM
安装并配置MariaDB
直接使用apt包管理器安装
root@megumin:~# apt update

root@megumin:~# apt -y install mariadb-server mariadb-client
然后按如下配置
root@megumin:~# mysql_secure_installation

NOTE: RUNNING ALL PARTS OF THIS SCRIPT IS RECOMMENDED FOR ALL MariaDB
      SERVERS IN PRODUCTION USE!  PLEASE READ EACH STEP CAREFULLY!

In order to log into MariaDB to secure it, we'll need the current
password for the root user.  If you've just installed MariaDB, and
you haven't set the root password yet, the password will be blank,
so you should just press enter here.

Enter current password for root (enter for none): <enter>
OK, successfully used password, moving on...

Setting the root password ensures that nobody can log into the MariaDB
root user without the proper authorisation.

Set root password? [Y/n] y
New password: 输入密码
Re-enter new password: 输入密码
Password updated successfully!
Reloading privilege tables..
 ... Success!


By default, a MariaDB installation has an anonymous user, allowing anyone
to log into MariaDB without having to have a user account created for
them.  This is intended only for testing, and to make the installation
go a bit smoother.  You should remove them before moving into a
production environment.

Remove anonymous users? [Y/n] y
 ... Success!

Normally, root should only be allowed to connect from 'localhost'.  This
ensures that someone cannot guess at the root password from the network.

Disallow root login remotely? [Y/n] y
 ... Success!

By default, MariaDB comes with a database named 'test' that anyone can
access.  This is also intended only for testing, and should be removed
before moving into a production environment.

Remove test database and access to it? [Y/n] y
 - Dropping test database...
 ... Success!
 - Removing privileges on test database...
 ... Success!

Reloading the privilege tables will ensure that all changes made so far
will take effect immediately.

Reload privilege tables now? [Y/n] y
 ... Success!

Cleaning up...

All done!  If you've completed all of the above steps, your MariaDB
installation should now be secure.

Thanks for using MariaDB!
然后创建nextcloud数据库和用户,注意第一条设置为自己的密码
root@megumin:~# mysql -u root -p
MariaDB [(none)]> CREATE USER 'nextcloud'@'localhost' IDENTIFIED BY '你的密码';
Query OK, 0 rows affected (0.003 sec)

MariaDB [(none)]> CREATE DATABASE nextcloud;
Query OK, 1 row affected (0.001 sec)

MariaDB [(none)]> GRANT ALL PRIVILEGES ON nextcloud.* TO 'nextcloud'@'localhost';
Query OK, 0 rows affected (0.004 sec)

MariaDB [(none)]> FLUSH PRIVILEGES;
Query OK, 0 rows affected (0.002 sec)

MariaDB [(none)]> QUIT
Bye
安装PHP8.2和Apache服务器
apt install lsb-release apt-transport-https ca-certificates software-properties-common

wget -O /etc/apt/trusted.gpg.d/php.gpg https://packages.sury.org/php/apt.gpg

sh -c 'echo "deb https://packages.sury.org/php/ $(lsb_release -sc) main" > /etc/apt/sources.list.d/php.list'

apt update

apt install php8.2

apt install vim php8.2-{bcmath,xml,fpm,mysql,zip,intl,ldap,gd,cli,bz2,curl,mbstring,pgsql,opcache,soap,cgi}

apt install apache2 libapache2-mod-php8.2
下载NextCloud
apt -y install wget curl unzip

wget https://download.nextcloud.com/server/releases/latest.zip

unzip latest.zip

rm -f latest.zip
解压安装包并移到apache的网站目录下,设置用户和用户组以及权限
mv nextcloud /var/www/html/

chown -R www-data:www-data /var/www/html/nextcloud

chmod -R 755 /var/www/html/nextcloud
禁用默认的apache服务配置
a2dissite 000-default.conf

rm /var/www/html/index.html

systemctl restart apache2
申请SSL证书并配置Apache服务器
这里申请Lets Encrypt官方推荐的certbot申请免费的证书,对了,在此之前要先准备一个域名
apt -y install certbot

systemctl stop apache2 # 使用certbot的standalone方法申请证书需要使用80端口,所以要先停掉

certbot certonly --standalone --agree-tos -d xxx.xxx.xxx --server https://api.buypass.com/acme/directory

systemctl restart apache2
得到的证书和私钥
/etc/letsencrypt/live/xxx.xxx.xxx/fullchain.pem

/etc/letsencrypt/live/xxx.xxx.xxx/privkey.pem
创建一个配置文件/etc/apache2/sites-available/nextcloud.conf,并加入以下内容,注意要把域名,证书和私钥文件改为自己的
<VirtualHost *:80>
        ServerName xxx.xxx.xxx
        RewriteEngine On
        RewriteCond %{HTTPS} !=on
        RewriteRule ^/?(.*) https://%{SERVER_NAME}/$1 [R=301,L]
</virtualhost>
<VirtualHost *:443>
        ServerAdmin xxx@gmail.com
        DocumentRoot /var/www/html/nextcloud/
        ServerName xxx.xxx.xxx
        <IfModule mod_headers.c>
          Header always set Strict-Transport-Security "max-age=15552000; includeSubDomains"
        </IfModule>
        <Directory /var/www/html/nextcloud/>
      Options Indexes FollowSymLinks MultiViews
      AllowOverride All
          Require all granted
       SetEnv HOME /var/www/html/nextcloud
       SetEnv HTTP_HOME /var/www/html/nextcloud
        </Directory>
        ErrorLog /var/log/apache2/nextcloud-error.log
        CustomLog /var/log/apache2/nextcloud-access.log combined
        SSLEngine on
        SSLCertificateFile /etc/letsencrypt/live/xxx.xxx.xxx/fullchain.pem
        SSLCertificateKeyFile /etc/letsencrypt/live/xxx.xxx.xxx/privkey.pem
</VirtualHost>
然后开启需要的apache模块,并使nextcloud.conf配置文件生效
a2enmod rewrite
a2enmod ssl

a2enmod headers
a2enmod env
a2enmod dir
a2enmod mime

a2ensite nextcloud.conf

systemctl reload apache2
验证配置
$ apachectl -t
Syntax OK
重启服务
systemctl restart apache2
然后编辑/var/www/html/nextcloud/config/config.php文件,将域名加入到受信任的域名中,才能使用域名访问
  'trusted_domains' =>
  array (
    0 => 'xxx.xxx.xxx',
  ),
进入网站https://xxx.xxx.xxx开始安装Nextcloud
-
进入网站页面后创建管理员用户和密码:
-
数据目录默认不动
-
再往下配置数据库,也就是之前用Mariadb创建的,密码就是自己前面设的
数据库用户:nextcloud
数据库密码:前面设的
数据库名:nextcloud
数据库主机:localhost
-
然后点击安装即可,等待安装完成即可
配置PHP-FPM
其实这一步并不是必需的,根据官网介绍Nextcloud使用Apache + PHP就可以正常使用,但我后来配了一下PHP-FPM感觉速度好像有一点优化
首先修改/etc/php/8.2/fpm/pool.d/www.conf中FPM的监听端口
listen = 127.0.0.1:9000
然后需要在Apache的配置文件/etc/apache2/sites-available/nextcloud.conf中加入调用PHP-FPM的配置
ProxyRequests Off

ProxyPassMatch ^/(.*\.php)$ fcgi://127.0.0.1:9000/var/www/html/nextcloud/$1
然后启动PHP-FPM和Apache
a2enconf php8.2-fpm

a2enmod proxy_fcgi setenvif

systemctl restart php8.2-fpm.service

systemctl reload apache2
到此为止就安装部分就结束了,剩下的就是需要进行性能优化,Nextcloud的性能优化非常重要,关于优化我就放在最后一部分介绍完LNMP的配置再说
LNMP
使用配置:Debian11 + Nginx + MariaDB + PHP8.2-FPM
有关PHP,MariaDB和Nextcloud的下载安装和LAMP相同,就不再赘述,Nginx的安装也不多介绍,下面就主要介绍Nginx的配置
Nginx需要用到PHP-FPM,所以需要先按照LAMP中的配置监听端口
Nginx配置
Nginx主配置文件/etc/nginx/nginx.conf,这里是我自己的配置,不需要完全一样
user  www-data www-data;

worker_processes  auto;

error_log  /var/log/nginx/error.log notice;

pid        /var/run/nginx.pid;

worker_rlimit_nofile  65535;

events {
    accept_mutex  on;

    multi_accept  on;

    use  epoll;

    worker_connections  65535;
}


http {
    include       /etc/nginx/mime.types;

    default_type  application/octet-stream;

    log_format  main  '$remote_addr–$remote_user [$time_local] $request $status $body_bytes_sent $http_referer $http_user_agent $http_x_forwarded_for';

    access_log  /var/log/nginx/access.log  main;

    #autoindex  off;

    sendfile        on;
    sendfile_max_chunk 128k;
    keepalive_timeout  120;
    tcp_nopush     on;
    tcp_nodelay    on;

    client_header_timeout  120s;
    client_body_timeout  120s;
    client_max_body_size  1000m;
    client_header_buffer_size  32k;
    client_body_buffer_size  256k;

    gzip  on;
    gzip_min_length  1k;
    gzip_buffers  4  16;
    gzip_http_version  1.1;
    gzip_comp_level  1;
    gzip_vary  on;
    gzip_types  text/plain application/x-javascript text/css text/javascript image/jpeg image/gif image/png;

    fastcgi_connect_timeout 300s;
    fastcgi_send_timeout 300s;
    fastcgi_read_timeout 300s;
    fastcgi_buffer_size 64k;
    fastcgi_buffers 4 64k;
    fastcgi_busy_buffers_size 128k;
    fastcgi_temp_file_write_size 128k;

    include /etc/nginx/conf.d/*.conf;
}
添加虚拟主机配置,在/etc/nginx/conf.d/中新建一个nextcloud.conf,并配置虚拟主机,下面的域名和ssl证书要改为自己的
upstream php-handler {
    server 127.0.0.1:9000;
    #server unix:/var/run/php/php7.4-fpm.sock;
}

# Set the `immutable` cache control options only for assets with a cache busting `v` argument
map $arg_v $asset_immutable {
    "" "";
    default "immutable";
}


server {
    listen 80;
    listen [::]:80;
    server_name xxx.xxx.xxx; # 改为自己的域名

    # Prevent nginx HTTP Server Detection
    server_tokens off;

    # Enforce HTTPS
    return 301 https://$server_name$request_uri;
}

server {
    listen 443      ssl http2;
    listen [::]:443 ssl http2;
    server_name xxx.xxx.xxx; # 改为自己的域名

    # Path to the root of your installation
    root /var/www/html/nextcloud;

    # Use Mozilla's guidelines for SSL/TLS settings
    # https://mozilla.github.io/server-side-tls/ssl-config-generator/
    ssl_certificate     /etc/letsencrypt/live/xxx.xxx.xxx/fullchain.pem;
    ssl_certificate_key /etc/letsencrypt/live/xxx.xxx.xxx/privkey.pem;

    # Prevent nginx HTTP Server Detection
    server_tokens off;

    # HSTS settings
    # WARNING: Only add the preload option once you read about
    # the consequences in https://hstspreload.org/. This option
    # will add the domain to a hardcoded list that is shipped
    # in all major browsers and getting removed from this list
    # could take several months.
    #add_header Strict-Transport-Security "max-age=15768000; includeSubDomains; preload" always;

    # set max upload size and increase upload timeout:
    client_max_body_size 20480m;
    client_body_timeout 300s;
    fastcgi_buffers 64 4K;

    # Enable gzip but do not remove ETag headers
    gzip on;
    gzip_vary on;
    gzip_comp_level 4;
    gzip_min_length 256;
    gzip_proxied expired no-cache no-store private no_last_modified no_etag auth;
    gzip_types application/atom+xml text/javascript application/javascript application/json application/ld+json application/manifest+json application/rss+xml application/vnd.geo+json application/vnd.ms-fontobject application/wasm application/x-font-ttf application/x-web-app-manifest+json application/xhtml+xml application/xml font/opentype image/bmp image/svg+xml image/x-icon text/cache-manifest text/css text/plain text/vcard text/vnd.rim.location.xloc text/vtt text/x-component text/x-cross-domain-policy;

    # Pagespeed is not supported by Nextcloud, so if your server is built
    # with the `ngx_pagespeed` module, uncomment this line to disable it.
    #pagespeed off;

    # The settings allows you to optimize the HTTP2 bandwitdth.
    # See https://blog.cloudflare.com/delivering-http-2-upload-speed-improvements/
    # for tunning hints
    client_body_buffer_size 512k;

    # HTTP response headers borrowed from Nextcloud `.htaccess`
    add_header Referrer-Policy                   "no-referrer"       always;
    add_header X-Content-Type-Options            "nosniff"           always;
    add_header X-Download-Options                "noopen"            always;
    add_header X-Frame-Options                   "SAMEORIGIN"        always;
    add_header X-Permitted-Cross-Domain-Policies "none"              always;
    add_header X-Robots-Tag                      "noindex, nofollow" always;
    add_header X-XSS-Protection                  "1; mode=block"     always;
    add_header Strict-Transport-Security         "max-age=15552000; includeSubDomains";

    # Remove X-Powered-By, which is an information leak
    fastcgi_hide_header X-Powered-By;

    # Add .mjs as a file extension for javascript
    # Either include it in the default mime.types list
    # or include you can include that list explicitly and add the file extension
    # only for Nextcloud like below:
    include mime.types;
    types {
        text/javascript js mjs;
    }

    # Specify how to handle directories -- specifying `/index.php$request_uri`
    # here as the fallback means that Nginx always exhibits the desired behaviour
    # when a client requests a path that corresponds to a directory that exists
    # on the server. In particular, if that directory contains an index.php file,
    # that file is correctly served; if it doesn't, then the request is passed to
    # the front-end controller. This consistent behaviour means that we don't need
    # to specify custom rules for certain paths (e.g. images and other assets,
    # `/updater`, `/ocm-provider`, `/ocs-provider`), and thus
    # `try_files $uri $uri/ /index.php$request_uri`
    # always provides the desired behaviour.
    index index.php index.html /index.php$request_uri;

    # Rule borrowed from `.htaccess` to handle Microsoft DAV clients
    location = / {
        if ( $http_user_agent ~ ^DavClnt ) {
            return 302 /remote.php/webdav/$is_args$args;
        }
    }

    location = /robots.txt {
        allow all;
        log_not_found off;
        access_log off;
    }

    # Make a regex exception for `/.well-known` so that clients can still
    # access it despite the existence of the regex rule
    # `location ~ /(\.|autotest|...)` which would otherwise handle requests
    # for `/.well-known`.
    location ^~ /.well-known {
        # The rules in this block are an adaptation of the rules
        # in `.htaccess` that concern `/.well-known`.

        location = /.well-known/carddav { return 301 /remote.php/dav/; }
        location = /.well-known/caldav  { return 301 /remote.php/dav/; }

        location /.well-known/acme-challenge    { try_files $uri $uri/ =404; }
        location /.well-known/pki-validation    { try_files $uri $uri/ =404; }

        # Let Nextcloud's API for `/.well-known` URIs handle all other
        # requests by passing them to the front-end controller.
        return 301 /index.php$request_uri;
    }

    # Rules borrowed from `.htaccess` to hide certain paths from clients
    location ~ ^/(?:build|tests|config|lib|3rdparty|templates|data)(?:$|/)  { return 404; }
    location ~ ^/(?:\.|autotest|occ|issue|indie|db_|console)                { return 404; }

    # Ensure this block, which passes PHP files to the PHP process, is above the blocks
    # which handle static assets (as seen below). If this block is not declared first,
    # then Nginx will encounter an infinite rewriting loop when it prepends `/index.php`
    # to the URI, resulting in a HTTP 500 error response.
    location ~ \.php(?:$|/) {
        # Required for legacy support
        rewrite ^/(?!index|remote|public|cron|core\/ajax\/update|status|ocs\/v[12]|updater\/.+|oc[ms]-provider\/.+|.+\/richdocumentscode\/proxy) /index.php$request_uri;

        fastcgi_split_path_info ^(.+?\.php)(/.*)$;
        set $path_info $fastcgi_path_info;

        try_files $fastcgi_script_name =404;

        include fastcgi_params;
        fastcgi_param SCRIPT_FILENAME $document_root$fastcgi_script_name;
        fastcgi_param PATH_INFO $path_info;
        fastcgi_param HTTPS on;

        fastcgi_param modHeadersAvailable true;         # Avoid sending the security headers twice
        fastcgi_param front_controller_active true;     # Enable pretty urls
        fastcgi_pass php-handler;

        fastcgi_intercept_errors on;
        fastcgi_request_buffering off;

        fastcgi_max_temp_file_size 0;
    }

    # Serve static files
    location ~ \.(?:css|js|mjs|svg|gif|png|jpg|ico|wasm|tflite|map)$ {
        try_files $uri /index.php$request_uri;
        add_header Cache-Control "public, max-age=15778463, $asset_immutable";
        access_log off;     # Optional: Don't log access to assets

        location ~ \.wasm$ {
            default_type application/wasm;
        }
    }

    location ~ \.woff2?$ {
        try_files $uri /index.php$request_uri;
        expires 7d;         # Cache-Control policy borrowed from `.htaccess`
        access_log off;     # Optional: Don't log access to assets
    }

    # Rule borrowed from `.htaccess`
    location /remote {
        return 301 /remote.php$request_uri;
    }

    location / {
        try_files $uri $uri/ /index.php$request_uri;
    }
}
然后重新启动(加载)Nginx配置后访问https://xxx.xxx.xxx安装Nextcloud就可以了,接下来就是至关重要的优化了!
性能优化
众所周知,Nextcloud不优化的性能是在是一言难尽
这部分除了优化也包括在Nextcloud网盘自动检查安全和设置警告中出现的一些问题的解决
验证电子邮件服务器
按如下填写后,证书后面的密码需要去谷歌申请应用密码
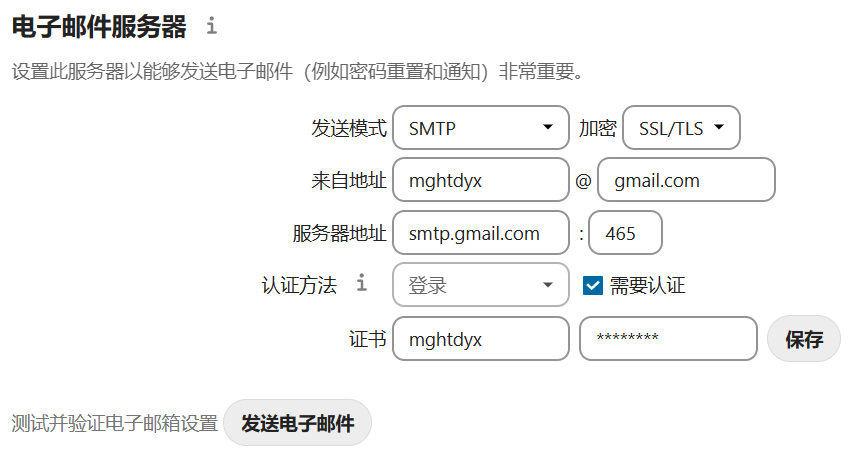
直接访问该链接申请,根据情况可以选择其他应用,随便输入个名字就可以。 如果提示不支持,则需要先到谷歌账号页面完成两步验证,具体如下: 谷歌账号页面点击安全性,在下面找到两步验证,按照要求完成后,再返回上面连接就能申请了。
警告提示:- The database is used for transactional file locking. To enhance performance, please configure memcache, if available. See the documentation ↗ for more information
解决方法:
首先安装redis
apt install redis-server php-redis
然后编辑该配置文件/var/www/html/nextcloud/config/config.php加入以下内容
'filelocking.enabled' => true,
'memcache.locking' => '\OC\Memcache\Redis',
'redis' => array(
     'host' => 'localhost',
     'port' => 6379,
     'timeout' => 0.0,
     'password' => '', // Optional, if not defined no password will be used.
      ),
警告提示:- 内存缓存未配置。为了提升性能,请尽量配置内存缓存。更多信息请参见文档↗
安装apcu
apt install php8.2-apcu
然后编辑/var/www/html/nextcloud/config/config.php加入下面内容
'memcache.local' => '\OC\Memcache\APCu',
编辑/etc/php/8.2/cli/php.ini,加入以下内容
[APCu]
apc.enable_cli=1
警告提示:PHP模块 “imagick” 没有被启用
apt install php8.2-imagick
警告提示:php-imagick模块不支持SVG
在终端输入apt install libmagickcore-,然后双击tab键,会显示以libmagickcore-开头的组件列表,然后安装libmagickcore-6.q16-6-extra
apt install libmagickcore-6.q16-6-extra
警告提示:PHP 模块 “gmp” 和/或 “bcmath” 未被启用
apt install php8.2-gmp php8.2-bcmath
警告提示:您的安装没有设置默认的电话区域。这对验证配置设定中没有国家代码的电话号码而言是必需的
找到/var/www/html/nextcloud/config/config.php文件,添加下面内容
'default_phone_region' => 'CN',
优化:使用cron计划任务替代默认的ajax
执行如下命令以 www-data 用户运行 crontab
crontab -u www-data -e
在文件末尾加入一行(注意站点路径改为你们自己的)
*/5 * * * * php8.2 -f /var/www/html/nextcloud/cron.php
然后登入nextcloud管理员在基本设置-后台任务中改为cron
mysql性能优化
打开/etc/mysql/conf.d/mysql.cnf,在这个文件内添加如下内容
[mysqld]
innodb_buffer_pool_size=1G
innodb_io_capacity=4000
重启 Mariadb
systemctl restart mariadb.service
调整PHP的进程数(针对PHP-FPM)
计算网站PHP-FPM Process Caluculator
打开文件/etc/php/8.2/fpm/pool.d/www.conf将参数修改为
pm = dynamic
pm.max_children = 40
pm.start_servers = 10
pm.min_spare_servers = 10
pm.max_spare_servers = 30
重启 PHP-FPM:
systemctl restart php8.2-fpm.service
修改内存和文件上传限制
使用Apache + PHP需要在配置文件(/etc/php/8.2/apache2/php.ini)中修改
使用Apache/Nginx + PHP-FPM需要在PHP-FPM配置文件(/etc/php/8.2/fpm/php.ini)中修改
memory_limit = 1.5G
upload_max_filesize = 16G
post_max_size = 16G
max_execution_time = 3600
max_input_time = 3600
;output_buffering = 4096
配置opcache
使用Apache + PHP需要在配置文件(/etc/php/8.2/apache2/php.ini)中修改
使用Apache/Nginx + PHP-FPM需要在PHP-FPM配置文件(/etc/php/8.2/fpm/php.ini)中修改
在opcache段的末尾加入如下内容
opcache.enable=1
opcache.enable_cli=1
opcache.interned_strings_buffer=8
opcache.max_accelerated_files=10000
opcache.memory_consumption=128
opcache.save_comments=1
opcache.revalidate_freq=1
关于优化部分就到此为止,注意修改完配置后记得重启PHP-FPM和Web服务才能生效